Btrfs NASのHDDが壊れたので交換した
NAS サーバーを久しぶりにディスプレイに接続したら大量の I/O error が出てびっくりした。 サーバーには4台の HDD を搭載し、Btrfs ファイルシステムにまとめて RAID1 で運用している。
Btrfs は B-tree File System の略である。バターFSと呼んでいる。日本の現場でどう呼ばれているかは知らない。ファイルシステムでネイティブにソフトウェア RAID をサポートしている。また、ディスク容量の異なる複数のデバイスを組み合わせて使えるところが大変に便利である。
I/O error について調べてみると、1つの HDD が壊れたようだったので復旧作業を行った。 この記事では、Btrfs ファイルシステムから壊れた HDD を取り外し、そして代わりに新しい HDD の組み込んだ作業を記録した。さらに、今後のためにシステム監視設定を入れた。
1. サーバー構成
Arch Linux:
# uname -a
Linux fg-arch 5.2.8-arch1-1-ARCH #1 SMP PREEMPT Fri Aug 9 21:36:07 UTC 2019 x86_64 GNU/Linux
Btrfs:
# btrfs --version
btrfs-progs v5.2.1
ディスクは HDD (SATA) が4台で、計約 11 TiB。
/dev/sda だけパーティションを細かく切って、そのうちの1つだけを Btrfs に回している。
/dev/sdb、/dev/sdc、/dev/sdd、/dev/sde は全体を1つのパーティションにして、もちろん Btrfs に回している。
ディスク一覧:
# fdisk -l
Disk /dev/sda: 2.75 TiB, 3000592982016 bytes, 5860533168 sectors
Disk model: TOSHIBA DT01ACA3
Units: sectors of 1 * 512 = 512 bytes
Sector size (logical/physical): 512 bytes / 4096 bytes
I/O size (minimum/optimal): 4096 bytes / 4096 bytes
Disklabel type: gpt
Disk identifier: FE3121B8-8077-4616-9AB6-0B1FC263D9EF

Device         Start        End    Sectors  Size Type
/dev/sda1       2048    1050623    1048576  512M EFI System
/dev/sda2    1050624    5244927    4194304    2G Linux swap
/dev/sda3    5244928   47187967   41943040   20G Linux filesystem
/dev/sda4   47187968  256903167  209715200  100G Linux filesystem
/dev/sda5  256903168 5860533134 5603629967  2.6T Linux filesystem


Disk /dev/sdb: 2.75 TiB, 3000592982016 bytes, 5860533168 sectors
Disk model: ST3000DM008-2DM1
Units: sectors of 1 * 512 = 512 bytes
Sector size (logical/physical): 512 bytes / 4096 bytes
I/O size (minimum/optimal): 4096 bytes / 4096 bytes
Disklabel type: gpt
Disk identifier: 3DA60B4B-1DB1-4507-B898-3DF3DEBC5568

Device     Start        End    Sectors  Size Type
/dev/sdb1   2048 5860533134 5860531087  2.7T Linux filesystem


Disk /dev/sdc: 186.32 GiB, 200049647616 bytes, 390721968 sectors
Disk model: WDC WD2000JD-19H
Units: sectors of 1 * 512 = 512 bytes
Sector size (logical/physical): 512 bytes / 512 bytes
I/O size (minimum/optimal): 512 bytes / 512 bytes
Disklabel type: gpt
Disk identifier: BA150377-B1F7-44F6-9978-C28ED7A053F3

Device     Start       End   Sectors   Size Type
/dev/sdc1   2048 390721934 390719887 186.3G Linux filesystem


The backup GPT table is corrupt, but the primary appears OK, so that will be used.
Disk /dev/sdd: 2.75 TiB, 3000592982016 bytes, 5860533168 sectors
Disk model: ST3000DM001-1CH1
Units: sectors of 1 * 512 = 512 bytes
Sector size (logical/physical): 512 bytes / 4096 bytes
I/O size (minimum/optimal): 4096 bytes / 4096 bytes
Disklabel type: gpt
Disk identifier: 74964753-44D2-4D8B-8BC8-7249020FF84F

Device     Start        End    Sectors  Size Type
/dev/sdd1   2048 5860533134 5860531087  2.7T Linux filesystem


Disk /dev/sde: 2.75 TiB, 3000592982016 bytes, 5860533168 sectors
Disk model: WDC WD30EZRX-00D
Units: sectors of 1 * 512 = 512 bytes
Sector size (logical/physical): 512 bytes / 4096 bytes
I/O size (minimum/optimal): 4096 bytes / 4096 bytes
Disklabel type: gpt
Disk identifier: BAF87B85-75E9-4293-8792-93504442972A

Device     Start        End    Sectors  Size Type
/dev/sde1   2048 5860533134 5860531087  2.7T Linux filesystem
既に見えちゃっているが、/dev/sdd で The backup GPT table is corrupt, but the primary appears OK, so that will be used. とかって出てしまっている。
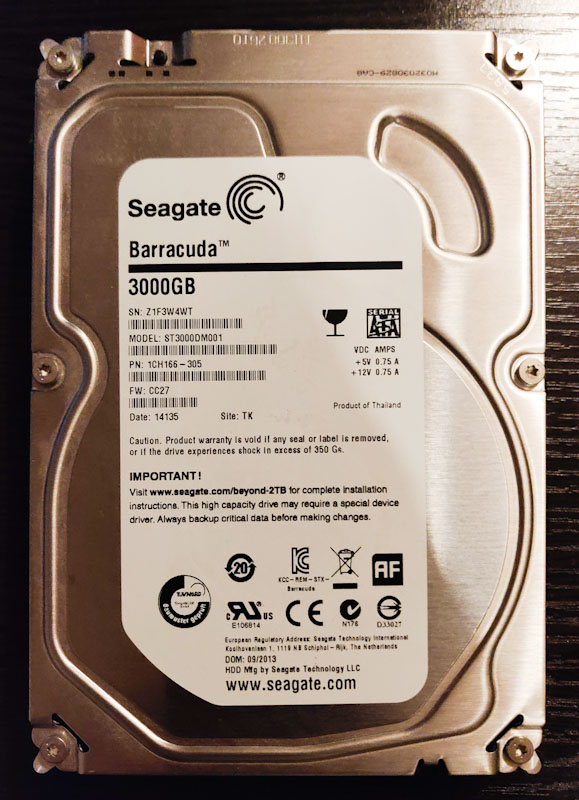
ちなみに上記は再起動の結果で、再起動前は fdisk -l に表示すらされていなかったので普通に死にかけと思われる。壊れたのは Seagate ST3000DM001 である。どうやら 2013/11/17 に購入したようであるから、6年弱くらいもったようだ。Google で検索してみると本機種は故障しやすいという評判が見られる。確かに一番はじめに故障したようだが、まあこれくらい使えたなら許容範囲か。直近の1年くらいは24時間無休だし。
ちなみに /dev/sde の Western Digital WD30EZRX は同じ日に購入したもの。
こっちはまだ元気みたいだ。
2. ファイルシステムの使用状況
まず Btrfs ファイルシステムは1つ。 これは4つのデバイスで作られている。
# btrfs filesystem show
Label: 'house'  uuid: 962205ef-673e-4b93-be7e-58bd23d68095
	Total devices 4 FS bytes used 2.63TiB
	devid    1 size 2.61TiB used 1.23TiB path /dev/sda5
	devid    2 size 2.73TiB used 1.35TiB path /dev/sdb1
	devid    4 size 2.73TiB used 1.35TiB path /dev/sdd1
	devid    5 size 2.73TiB used 1.35TiB path /dev/sde1
subvolume は3つある。
# ls /house/
entrance  library  living
ファイルシステムの合計サイズは計 10.80Tib として認識されている。 現在保存されているデータ量は 2.63Tib であるが、RAID1 でミラーリングされているのでファイルシステム上は 5.27Tib が割り当てられている。 というわけで残り保存できるのは 2.26Tib のデータで、物理容量は 5.52Tib である。
/dev/sdd を取り外すには、その分の 1.35Tib を残り3つのデバイスに配分できればよい。1台あたり 0.44 Tib 程度の使用のはずなので容量は十分にあると言えそう。
# btrfs filesystem usage /house/library
Overall:
    Device size:		  10.80TiB
    Device allocated:		   5.27TiB
    Device unallocated:		   5.52TiB
    Device missing:		     0.00B
    Used:			   5.26TiB
    Free (estimated):		   2.76TiB	(min: 2.76TiB)
    Data ratio:			      2.00
    Metadata ratio:		      2.00
    Global reserve:		 512.00MiB	(used: 0.00B)

Data,RAID1: Size:2.63TiB, Used:2.63TiB
   /dev/sda5	   1.22TiB
   /dev/sdb1	   1.34TiB
   /dev/sdd1	   1.35TiB
   /dev/sde1	   1.35TiB

Metadata,RAID1: Size:7.00GiB, Used:5.17GiB
   /dev/sda5	   4.00GiB
   /dev/sdb1	   5.00GiB
   /dev/sdd1	   2.00GiB
   /dev/sde1	   3.00GiB

System,RAID1: Size:32.00MiB, Used:400.00KiB
   /dev/sda5	  32.00MiB
   /dev/sdb1	  32.00MiB

Unallocated:
   /dev/sda5	   1.38TiB
   /dev/sdb1	   1.38TiB
   /dev/sdd1	   1.38TiB
   /dev/sde1	   1.38TiB
統計情報の表示もできる。
やはり /dev/sdd1 がエラーを出しまくっているようだ。
異常なのはこいつだけで、他は問題無さそうに見える。
# btrfs device stats /house/library
[/dev/sda5].write_io_errs    0
[/dev/sda5].read_io_errs     0
[/dev/sda5].flush_io_errs    0
[/dev/sda5].corruption_errs  0
[/dev/sda5].generation_errs  0
[/dev/sdb1].write_io_errs    0
[/dev/sdb1].read_io_errs     0
[/dev/sdb1].flush_io_errs    0
[/dev/sdb1].corruption_errs  0
[/dev/sdb1].generation_errs  0
[/dev/sdd1].write_io_errs    253847606
[/dev/sdd1].read_io_errs     7493551
[/dev/sdd1].flush_io_errs    5045095
[/dev/sdd1].corruption_errs  0
[/dev/sdd1].generation_errs  0
[/dev/sde1].write_io_errs    0
[/dev/sde1].read_io_errs     0
[/dev/sde1].flush_io_errs    0
[/dev/sde1].corruption_errs  0
[/dev/sde1].generation_errs  0
3. 故障デバイスの取り外し
以下のコマンドで /dev/sdd1 を取り外す。
完全に壊れきっている場合には btrfs device remove missing とか使うらしいが、今回は瀕死ながらまだかろうじて生きていたので、普通の remove にした。
先ほど subvolume は3つあると書いたが、これらはファイルシステムを共有しているので remove するのもどれか1つに対して行えばよい。
# btrfs device remove /dev/sdd1 /house/library
この操作はかなりの時間がかかる。
/dev/sdd1 に書き込まれていたデータ全てを他のデバイスに再割り当てするためだ。
しかし取り外しが終わった暁には、外したデバイス抜きで完結する状態になっている。
また、ありがたいことに進捗が確認できる。
以下は5時間経過したときの状態である。/dev/sdd1 の残り used 938 Gib を他のデバイスに割り当てれば完了。
まだ8時間はかかりそうなので寝たりして待つことにした。
# btrfs filesystem show
Label: 'house'  uuid: 962205ef-673e-4b93-be7e-58bd23d68095
	Total devices 4 FS bytes used 2.63TiB
	devid    1 size 2.61TiB used 1.42TiB path /dev/sda5
	devid    2 size 2.73TiB used 1.54TiB path /dev/sdb1
	devid    4 size 0.00B used 938.00GiB path /dev/sdd1
	devid    5 size 2.73TiB used 1.40TiB path /dev/sde1
そして次に起きたときには、残念ながら /dev/sdd が倒れたためか、処理の途上で止まっていたので、再起動して /dev/sdd を叩き起こし再開。
暇だったので残りの時間で新しい HDD を買いに秋葉原へ行ったりした。
9時間後 完了
ファイルシステムに /dev/sdd が表示されなくなった:
# btrfs filesystem show
Label: 'house'  uuid: 962205ef-673e-4b93-be7e-58bd23d68095
	Total devices 3 FS bytes used 2.63TiB
	devid    1 size 2.61TiB used 1.87TiB path /dev/sda5
	devid    2 size 2.73TiB used 1.99TiB path /dev/sdb1
	devid    5 size 2.73TiB used 1.41TiB path /dev/sde1
ダラダラ流れ続けていた dmesg のエラーも止まった。めでたしめでたし。
ここまできて HDD を PC から物理的にも取り外した。 以下が壊れたっぽい HDD である:
4. 新デバイスの追加
秋葉原で買ってきた新しいディスクは Toshiba MD05ACA800。 8TB 128MB SATA 6Gbit/s 7200rpm。
ツクモで 20 台限定で税込 18,000 円だった。 底面にある固定用のねじ穴の位置が変なため、うちの Define R5 にはあまり綺麗に収まらなかった。
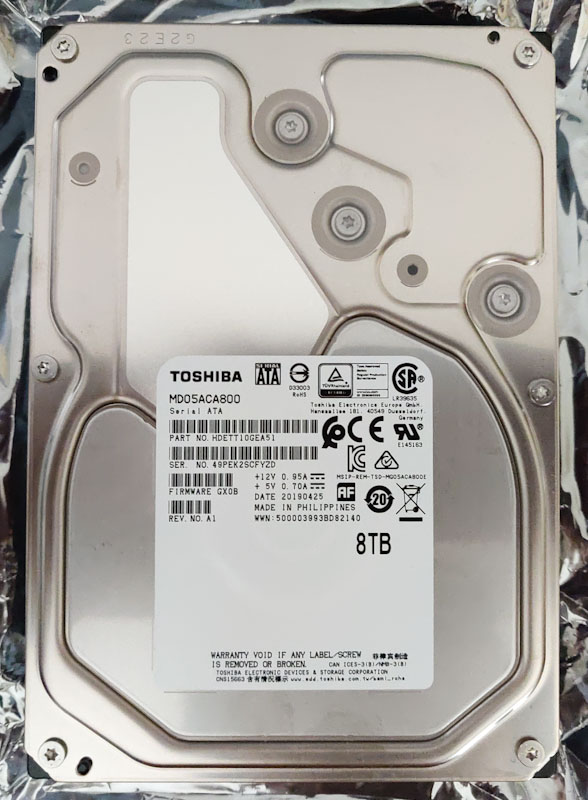
写真の色合いが先程の Seagate のものと異なるが、撮影した時間帯が違うだけであり、購入してから時間が経ってくすんでしまったわけではない。
PC に差してみるとこんな感じ:
# fdisk -l /dev/sdd
Disk /dev/sdd: 7.28 TiB, 8001563222016 bytes, 15628053168 sectors
Disk model: TOSHIBA MD05ACA8
Units: sectors of 1 * 512 = 512 bytes
Sector size (logical/physical): 512 bytes / 4096 bytes
I/O size (minimum/optimal): 4096 bytes / 4096 bytes
ちゃんと認識された。TB から TiB に読み替えると数字が 1TB 近くも小さくなる。
パーティションを作成。全部を1つのパーティションにした。 基本的な方法は前回と同じ通りにやった:
# gdisk /dev/sdd
GPT fdisk (gdisk) version 1.0.4

Partition table scan:
  MBR: not present
  BSD: not present
  APM: not present
  GPT: not present

Creating new GPT entries in memory.

Command (? for help): p
Disk /dev/sdd: 15628053168 sectors, 7.3 TiB
Model: TOSHIBA MD05ACA8
Sector size (logical/physical): 512/4096 bytes
Disk identifier (GUID): 14F019E6-FBD7-4D69-B3E1-13CE8012C79A
Partition table holds up to 128 entries
Main partition table begins at sector 2 and ends at sector 33
First usable sector is 34, last usable sector is 15628053134
Partitions will be aligned on 2048-sector boundaries
Total free space is 15628053101 sectors (7.3 TiB)

Number  Start (sector)    End (sector)  Size       Code  Name

Command (? for help): n
Partition number (1-128, default 1):
First sector (34-15628053134, default = 2048) or {+-}size{KMGTP}: 34
Information: Moved requested sector from 34 to 2048 in
order to align on 2048-sector boundaries.
Use 'l' on the experts' menu to adjust alignment
Last sector (2048-15628053134, default = 15628053134) or {+-}size{KMGTP}:
Current type is 'Linux filesystem'
Hex code or GUID (L to show codes, Enter = 8300): 8300
Changed type of partition to 'Linux filesystem'

Command (? for help): p
Disk /dev/sdd: 15628053168 sectors, 7.3 TiB
Model: TOSHIBA MD05ACA8
Sector size (logical/physical): 512/4096 bytes
Disk identifier (GUID): 14F019E6-FBD7-4D69-B3E1-13CE8012C79A
Partition table holds up to 128 entries
Main partition table begins at sector 2 and ends at sector 33
First usable sector is 34, last usable sector is 15628053134
Partitions will be aligned on 2048-sector boundaries
Total free space is 2014 sectors (1007.0 KiB)

Number  Start (sector)    End (sector)  Size       Code  Name
   1            2048     15628053134   7.3 TiB     8300  Linux filesystem

Command (? for help): w

Final checks complete. About to write GPT data. THIS WILL OVERWRITE EXISTING
PARTITIONS!!

Do you want to proceed? (Y/N): Y
OK; writing new GUID partition table (GPT) to /dev/sdd.
The operation has completed successfully.
パーティションできた:
# partprobe
# ls /dev/sdd1
/dev/sdd1
Btrfs 用のファイルシステムの作成:
# mkfs.btrfs -f /dev/sdd1
btrfs-progs v5.2.1
See http://btrfs.wiki.kernel.org for more information.

Label:              (null)
UUID:               4099d0b9-fa28-4867-adb0-8e0f0a528e2f
Node size:          16384
Sector size:        4096
Filesystem size:    7.28TiB
Block group profiles:
  Data:             single            8.00MiB
  Metadata:         DUP               1.00GiB
  System:           DUP               8.00MiB
SSD detected:       no
Incompat features:  extref, skinny-metadata
Number of devices:  1
Devices:
   ID        SIZE  PATH
    1     7.28TiB  /dev/sdd1
既存ファイルシステムへの組み込み:
# btrfs device add -f /dev/sdd1 /house/library
# btrfs filesystem show
Label: 'house'  uuid: 962205ef-673e-4b93-be7e-58bd23d68095
	Total devices 4 FS bytes used 2.63TiB
	devid    1 size 2.61TiB used 1.87TiB path /dev/sda5
	devid    2 size 2.73TiB used 1.99TiB path /dev/sdb1
	devid    5 size 2.73TiB used 1.41TiB path /dev/sde1
	devid    6 size 7.28TiB used 0.00B path /dev/sdd1
新規に追加した /dev/sdd1 は used 0.00B になっており、まだ何も書かれていないことがわかる。
バランシング。ある日の15:20頃から開始した。日付が変わることには終わっていればいいな。:
# btrfs balance /house/library
WARNING:

	Full balance without filters requested. This operation is very
	intense and takes potentially very long. It is recommended to
	use the balance filters to narrow down the scope of balance.
	Use 'btrfs balance start --full-balance' option to skip this
	warning. The operation will start in 10 seconds.
	Use Ctrl-C to stop it.
10 9 8 7 6 5 4 3 2 1
Starting balance without any filters.
20時間位経過し、翌日昼頃には終わっていた気がする。
# btrfs filesystem show
Label: 'house'  uuid: 962205ef-673e-4b93-be7e-58bd23d68095
	Total devices 4 FS bytes used 2.64TiB
	devid    1 size 2.61TiB used 632.03GiB path /dev/sda5
	devid    2 size 2.73TiB used 755.00GiB path /dev/sdb1
	devid    5 size 2.73TiB used 1.29TiB path /dev/sde1
	devid    6 size 7.28TiB used 2.64TiB path /dev/sdd1
5. btrfs scrub
これまで一度たりとも実行したことが無かったが、本当は btrfs scrub を1ヶ月に1度くらい実行することが推奨されている。
btrfs scrub を使うと、Btrfs ファイルシステムに属する全デバイス上の全データとメタデータブロックを読み込んで、チェックサムが正しいか確認する。ブロックが破損していた場合、コピーが利用可能であればそれを使ってデータを勝手に修復してくれる。
なおチェックサムは各データブロックごとに生成されるメタデータブロックに保持されているらしい。
btrfs scrub is used to scrub a btrfs filesystem, which will read all data and metadata blocks from all devices and verify checksums. Automatically repair corrupted blocks if there’s a correct copy available.
Note: Scrub is not a filesystem checker (fsck) and does not verify nor repair structural damage in the filesystem.
The user is supposed to run it manually or via a periodic system service. The recommended period is a month but could be less. The estimated device bandwidth utilization is about 80% on an idle filesystem. The IO priority class is by default idle so background scrub should not interfere with normal filesystem operation significantly.
The scrubbing status is recorded in /var/lib/btrfs/ in textual files named scrub.status.UUID for a filesystem identified by the given UUID. (Progress state is communicated through a named pipe in file scrub.progress.UUID in the same directory.) The status file is updated every 5 seconds. A resumed scrub will continue from the last saved position.
5.1. btrfs scrub の手動実行
scrub の手動実行は以下のようにする。
# btrfs scrub start /house/library
scrub started on /house/library, fsid 962205ef-673e-4b93-be7e-58bd23d68095 (pid=2100)
実行中はシステムをサスペンドすることができない。 そこそこの時間がかかるためか、進捗を確認するための専用のコマンドがある。
# btrfs scrub status /house/library
UUID:             962205ef-673e-4b93-be7e-58bd23d68095
Scrub started:    Tue Sep 24 19:56:43 2019
Status:           running
Duration:         1:51:08
Time left:        1:18:02
ETA:              Tue Sep 24 23:05:53 2019
Total to scrub:   5.28TiB
Bytes scrubbed:   3.10TiB
Rate:             487.88MiB/s
Error summary:    no errors found
全部で3時間くらいなのでそんなでもない。
おまけ 壊れた HDD で scrub したとき
以下は /dev/sdd1 を取り外す前に実行した時の進捗情報である。
2000 時間かかりそうって言われた…!! 3ヶ月かかるぞと。
# btrfs scrub status /house/library
UUID:             962205ef-673e-4b93-be7e-58bd23d68095
Scrub started:    Mon Sep 23 00:28:13 2019
Status:           running
Duration:         0:11:49
Time left:        2073:04:52
ETA:              Wed Dec 18 09:44:55 2019
Total to scrub:   5.27TiB
Bytes scrubbed:   524.62MiB
Rate:             757.71KiB/s
Error summary:    read=32608
  Corrected:      0
  Uncorrectable:  32608
  Unverified:     0
そして Uncorrectable が既に山ほど出ている。 先程の scrub の説明から考えると、データは壊れているかもしれないけど、データは復旧できなかった。ということになる。ディスクが壊れているのでうまくできないのは当然か。
とにかく直りもしないものに3ヶ月かけても希望は無いので途中で停止した。
# btrfs scrub cancel /house/library
scrub cancelled
ちなみに scrub のログは /var/lib/btrfs に保存される。
# ls /var/lib/btrfs/
scrub.status.962205ef-673e-4b93-be7e-58bd23d68095
5.2. btrfs scrub の定期実行
scrub は1ヶ月かそれ以下くらいの間隔で実行するのが推奨されている。 実はそのための systemd サービスが既に用意されている。
サービスの定義ファイルは以下にあった。
# ls /usr/lib/systemd/system/btrfs*
/usr/lib/systemd/system/btrfs-scrub@.service
/usr/lib/systemd/system/btrfs-scrub@.timer
有効化:
@ の後ろは scrub するパスを記載する。ただし systemd-escape で得られる通りにエスケープしておく必要がある。
Start with a service or timer - ArchWiki
# systemd-escape -p /house/library
house-library
# systemctl start btrfs-scrub@house-library.timer
# systemctl enable btrfs-scrub@house-library.timer
btrfs-scrub\@.service の中身:
# cat
[Unit]
Description=Btrfs scrub on %f

[Service]
Nice=19
IOSchedulingClass=idle
KillSignal=SIGINT
ExecStart=/usr/bin/btrfs scrub start -B %f
btrfs-scrub\@.timer の中身:
[Unit]
Description=Monthly Btrfs scrub on %f

[Timer]
OnCalendar=monthly
AccuracySec=1d
RandomizedDelaySec=1w
Persistent=true

[Install]
WantedBy=multi-user.target
6. システム監視
今回は HDD が壊れていることに偶然気づいたが、本来はちゃんと普段から監視しておき、前兆を把握し事前に対処を施しておくべきである。当然である。
反省したので監視の設定を入れることにする。
6.1. S.M.A.R.T.
S.M.A.R.T. は Self-Monitoring, Analysis and Reporting Technology の略である。HDD た SSD の自己診断を行う監視システムのことだ。
ディスク側の対応も必要だが、大体のものは S.M.A.R.T. の機能を持っているようだ。
S.M.A.R.T テスト手動実行
テストツールのインストール:
# pacman -S smartmontools
ちなみに壊れた HDD (/dev/sdd) はテストが開始する前に失敗した。
# smartctl -s on /dev/sdd
# smartctl -t short /dev/sdd
smartctl 7.0 2018-12-30 r4883 [x86_64-linux-5.2.8-arch1-1-ARCH] (local build)
Copyright (C) 2002-18, Bruce Allen, Christian Franke, www.smartmontools.org

Short INQUIRY response, skip product id
A mandatory SMART command failed: exiting. To continue, add one or more '-T permissive' options.
何度か試すともう少し進む場合もあったが、いずれにしろ全然駄目なようだ。
# smartctl -t short /dev/sdd
smartctl 7.0 2018-12-30 r4883 [x86_64-linux-5.2.8-arch1-1-ARCH] (local build)
Copyright (C) 2002-18, Bruce Allen, Christian Franke, www.smartmontools.org

Read SMART Data failed: scsi error badly formed scsi parameters
換装後の HDD では以下のようになった。
# smartctl -t short /dev/sdd
# smartctl -l selftest /dev/sdd
smartctl 7.0 2018-12-30 r4883 [x86_64-linux-5.3.1-arch1-1-ARCH] (local build)
Copyright (C) 2002-18, Bruce Allen, Christian Franke, www.smartmontools.org

=== START OF READ SMART DATA SECTION ===
SMART Self-test log structure revision number 1
Num  Test_Description    Status                  Remaining  LifeTime(hours)  LBA_of_first_error
# 1  Short offline       Completed without error       00%        31         -
# 2  Short offline       Completed without error       00%        11         -
# 3  Short offline       Completed without error       00%         0         -
S.M.A.R.T. テスト自動実行
/etc/smartd.conf を編集して以下のようにする。
関係無い行は全てコメントアウト。
-a全部のテストを実行する。-S onデバイスの自動保存を有効化する。-n standby,qスタンバイの時はテストしない。テストを省略した場合にログを書き込まない。-s (S/../.././02|L/../../6/03)短いテストを毎日2時、長いテストを毎週土曜日3時に実行する。-W 4,45,504°c以上の温度変化、または45°cに到達したらログに記録する。50°cを越えたらメールする。-m通知の送り先メールアドレス。
# DEVICESCAN
DEVICESCAN -a -S on -n standby,q -s (S/../.././02|L/../../6/03) -W 4,45,50 -m report@example.net
サービスの開始と有効化。このサービスは timer とかの設定をしなくても自分で時間を見計らってテストを実行してくるようだ。
# systemctl start smartd
# systemctl enable smartd
うまくいったか確認したい場合は以下のコマンド:
# systemctl status smartd
# journalctl -u smartd
6.2. Msmtp
システム監視で異常を検知した際には、メールで教えてくれるようにしたい。 そこでメール送信の設定を行う。
Msmtp は送信にのみ機能を絞ったメールクライアントである。
Arch Linux では sendmail は pacman でインストールすることができないし、 Postfix は多機能すぎて面倒臭い。そこで Msmtp が適役である。
インストール:
# pacman -S msmtp msmtp-mta
msmtp-mta をインストールすると、sendmail のコマンドで msmtp が利用されるようになる。
設定:
# cat ~/.msmtprc
defaults

account default
logfile ~/.msmtp.log
host example.net
port 587
from fg-arch@h.xaxxi.net
テストメールを送信してみる:
# cat <<EOF | sendmail report@example.net
> From: fg-arch@h.xaxxi.net
> To: report@example.net
> Subject: Test mail by msmtp
>
> This is test mail.
> EOF
サーバーを起動する必要も無いので清潔感があり素晴らしい。
6.3. Logwatch
Logwatch は各種ログを定期的にチェックし、集計、要約するために広く使われているツール。少し古くてダサい感もあるけど、現在もなお有用である。
インストール:
# pacman -S logwatch
6.3.1. Logwatch 設定
Logwatch の設定。メールで通知してくれるようにした。
# cat /etc/logwatch/conf/logwatch.conf
MailTo = report@example.net
Detail = Med
MailFrom = Logwatch for fg-arch
Output = mail
Service = All
Service = -zz-network
Service = -zz-lm_sensors
テスト実行する場合にはレポートを標準出力に書き出すとかできる:
# logwatch --range yesterday --output stdout
実行してみると、Logwatch のデフォルトではうまく集計できないサービスがあることがわかる。それらについては独自に設定を作成した。
Logwatch では各サービス毎に以下の2つのファイルを作成する:
/etc/logwatch/conf/services/SERVICE.confサービスの基本設定/etc/logwatch/scripts/services/SERVICEサービスの集計スクリプト
6.3.2. Kernel 向け Logwatch 設定
Audit と Btrfs について役に立たないログが大量に出ているので、まずこれを抑制する。
/etc/logwatch/conf/services/kernel.conf:
Title = "Kernel"
LogFile = messages

*OnlyService = kernel:

*Remove = "audit:"
*Remove = "BTRFS"
*RemoveHeaders
デフォルトのものは /usr/share/logwatch/default.conf/services/kernel.conf にあるので、これをコピーして編集すればよいだろう。
6.3.3. Audit 向け Logwatch 設定
先程出力されないようにした Audit について、いい感じの表示になるように設定する。 元の設定のままでは CRON の成功ログが大量に出てしまうので、これを集計する。
/etc/logwatch/conf/services/audit.conf:
Title = "Audit"
LogFile = messages

*OnlyService = kernel: audit:
*RemoveHeaders
/etc/logwatch/scripts/services/audit:
#!/bin/perl

%result = ();

while (defined($_ = <>)) {
	next unless /msg='(.+)'/;
	$k = $1;
	$k =~ s/ \S+=\? / /g;
	$result{$k}++;
}

foreach $k (sort(keys(%result))) {
	printf "%s: %d Time(s)\n", $k, $result{$k};
}
Perl が本領発揮している感がある。
6.3.4. Btrfs 向け Logwatch 設定
Btrfs はどんなログが出るのかよくわかっていないため、ゆるめに設定しておいた。
/etc/logwatch/conf/services/btrfs.conf:
Title = "Btrfs"
LogFile = messages

*OnlyService = kernel: BTRFS
*RemoveHeaders
etc/logwatch/scripts/services/btrfs:
#!/bin/perl

while (defined($_ = <>)) {
	print;
}
6.3.5. nsupdate 向け Logwatch 設定
調子に乗って nsupdate 向けの設定も書いた。
/etc/logwatch/conf/services/nsupdate.conf:
Title = "nsupdate"
LogFile = messages

*OnlyService = nsupdate.sh
*RemoveHeaders
/etc/logwatch/scripts/services/nsupdate:
#!/bin/perl

$state = 0;
$status;
%result = ();

while (defined ($line = <>)) {
	#printf "%d %s", $state, $line;
	if ($state == 0) {
		if ($line =~ /Reply from update query:/) {
			$state = 1;
		}
	} elsif ($state == 1) {
		if ($line =~ /status: (\S+),/) {
			$status = $1;
		} elsif ($line =~ /ZONE SECTION:/) {
			$state = 2;
		}
	} elsif ($state == 2) {
		if ($line =~ /^;(\S+)/) {
			$result{"$1 $status"}++;
			$state = 0;
		}
	}
}

while (($k, $v) = each %result) {
	printf "%s: %d Time(s)", $k, $v;
}
6.3.6. Logwatch サービス設定
Systemd のタイマーファイルが自動的に生成されているので、それを有効化する。
# systemctl start logwatch.timer
# systemctl enable logwatch.timer
ちなみに logwatch.timer の中身は以下のようになっている:
# cat /usr/lib/systemd/system/logwatch.timer
[Unit]
Description=Daily logwatch run
Documentation=man:logwatch(8) man:logwatch.conf(5)

[Timer]
OnCalendar=daily
AccuracySec=12h
Persistent=true

[Install]
WantedBy=timers.target
logwatch.service はこう:
# cat /usr/lib/systemd/system/logwatch.service
[Unit]
Description=Log analyzer and reporter
Documentation=man:logwatch(8) man:logwatch.conf(5)
Before=logrotate.service

[Service]
Type=oneshot
ExecStart=/usr/sbin/logwatch
7. 感想
めちゃ長くなった。
8. 参考ページ
Btrfs:
- Btrfs - ArchWiki
- Manpage/btrfs-scrub - btrfs Wiki
- How does btrfs scrub work and what does it do? - Super User
- Start with a service or timer - ArchWiki
過去の Btrfs 関連記事:
S.M.A.R.T.:
Logwatch: